Registration Forms
A registration form is a public page on your storefront where prospective wholesale buyers apply. They fill in their company info, you review the submission in the app, and approve them into a group with one click.
You can have multiple forms — for example, a general Wholesale application plus a separate International distributors form with different required fields.
The flow, end to end
Section titled “The flow, end to end”- You build a form in the app’s Form builder.
- You add the Wholesale Registration app block to your theme and point it at the form.
- A buyer visits the page, fills in the form, and submits.
- The submission shows up in Registrations as
pending. - You review it; click Approve to add the buyer to a group, or Reject with an optional reason.
- The buyer receives an email — approved or rejected — with whatever message you’ve configured in the email templates.
Create a form
Section titled “Create a form”- Open Registrations → Forms and click Create form.
- Give the form a name. The name is internal — buyers don’t see it.
- The form opens in the builder with three default fields: First name, Last name, Email.
Built-in fields
Section titled “Built-in fields”Some fields the form always supports — they’re re-used across email templates and the approval screen:
- First name, Last name, Email (required)
- Company name, Phone, Tax ID (optional)
- A free-form Message field
Custom fields
Section titled “Custom fields”You can add custom fields too: text, textarea, select, checkbox, or number. Custom field values show up on the review page as a list when you open the submission.
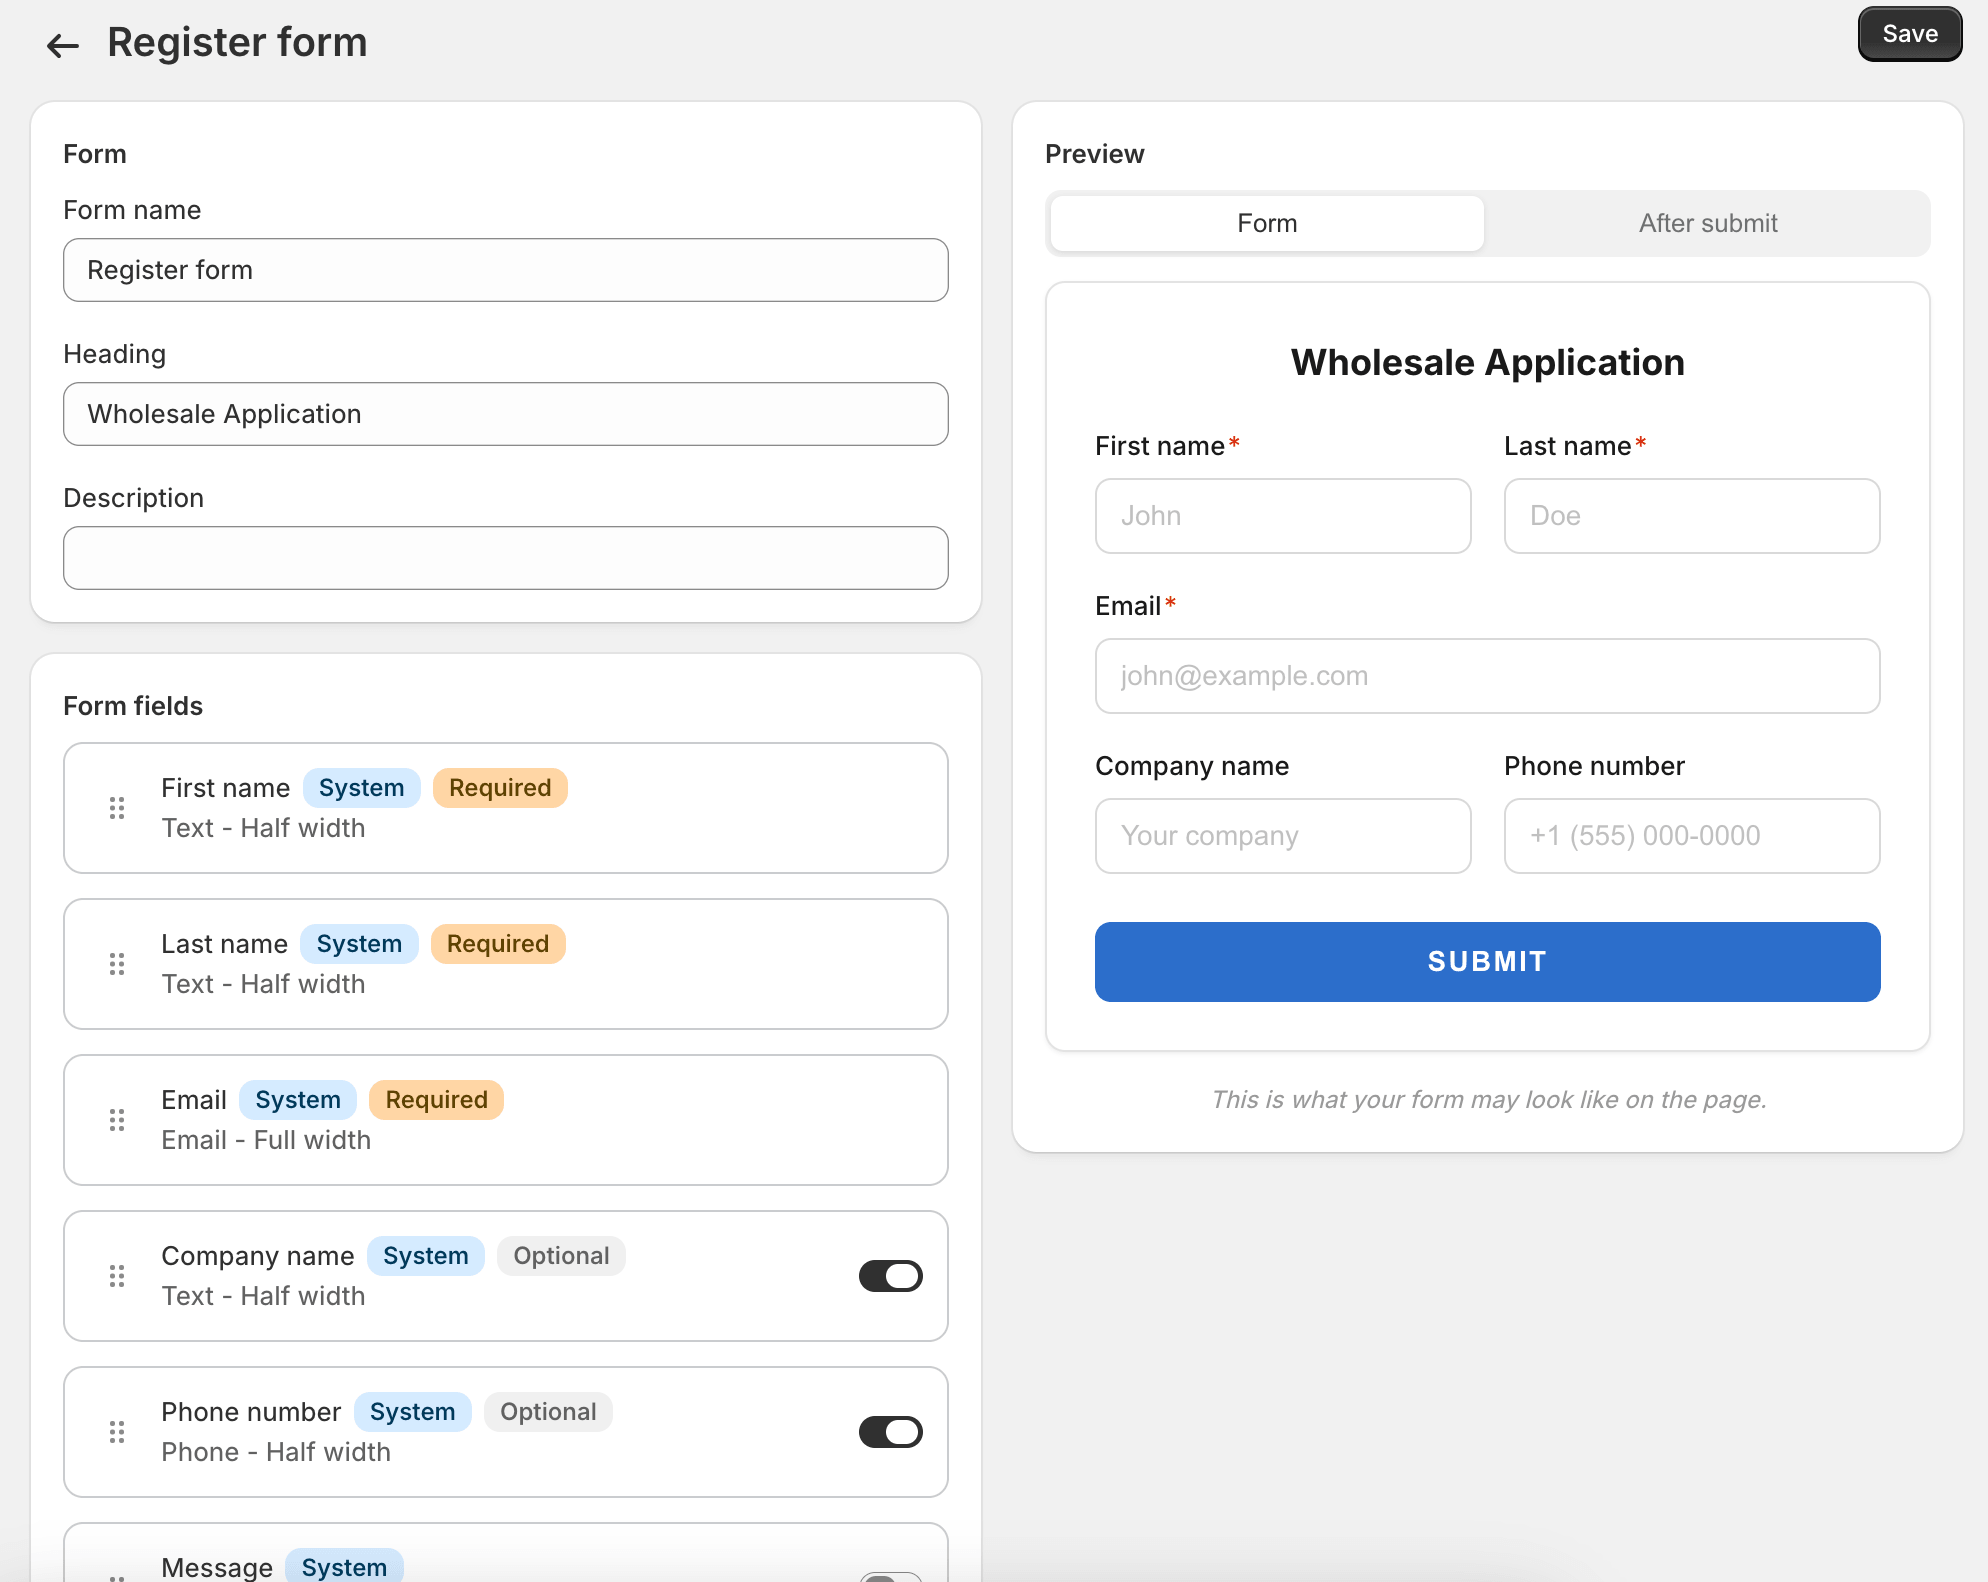
Heading, description, success state
Section titled “Heading, description, success state”Above the field list, the form has:
- Heading — shown above the form fields on the storefront.
- Description — sub-heading text. Optional.
- After-submit action — either show a success message in place, or redirect to a URL of your choice.
- Success heading and message — used when the action is Show message.
For approval workflows that take longer than a couple of business days, say so in the success message. Buyers expect immediate access on most sign-up forms; wholesale applications are different and worth being explicit about.
Place the form on your storefront
Section titled “Place the form on your storefront”- In Shopify admin, go to Online Store → Themes → Customize.
- Open or create a page (a dedicated Apply for Wholesale page works well).
- Click Add section → Apps → Wholesale Registration.
- In the block’s settings panel, choose which form to render.
- Save the theme.
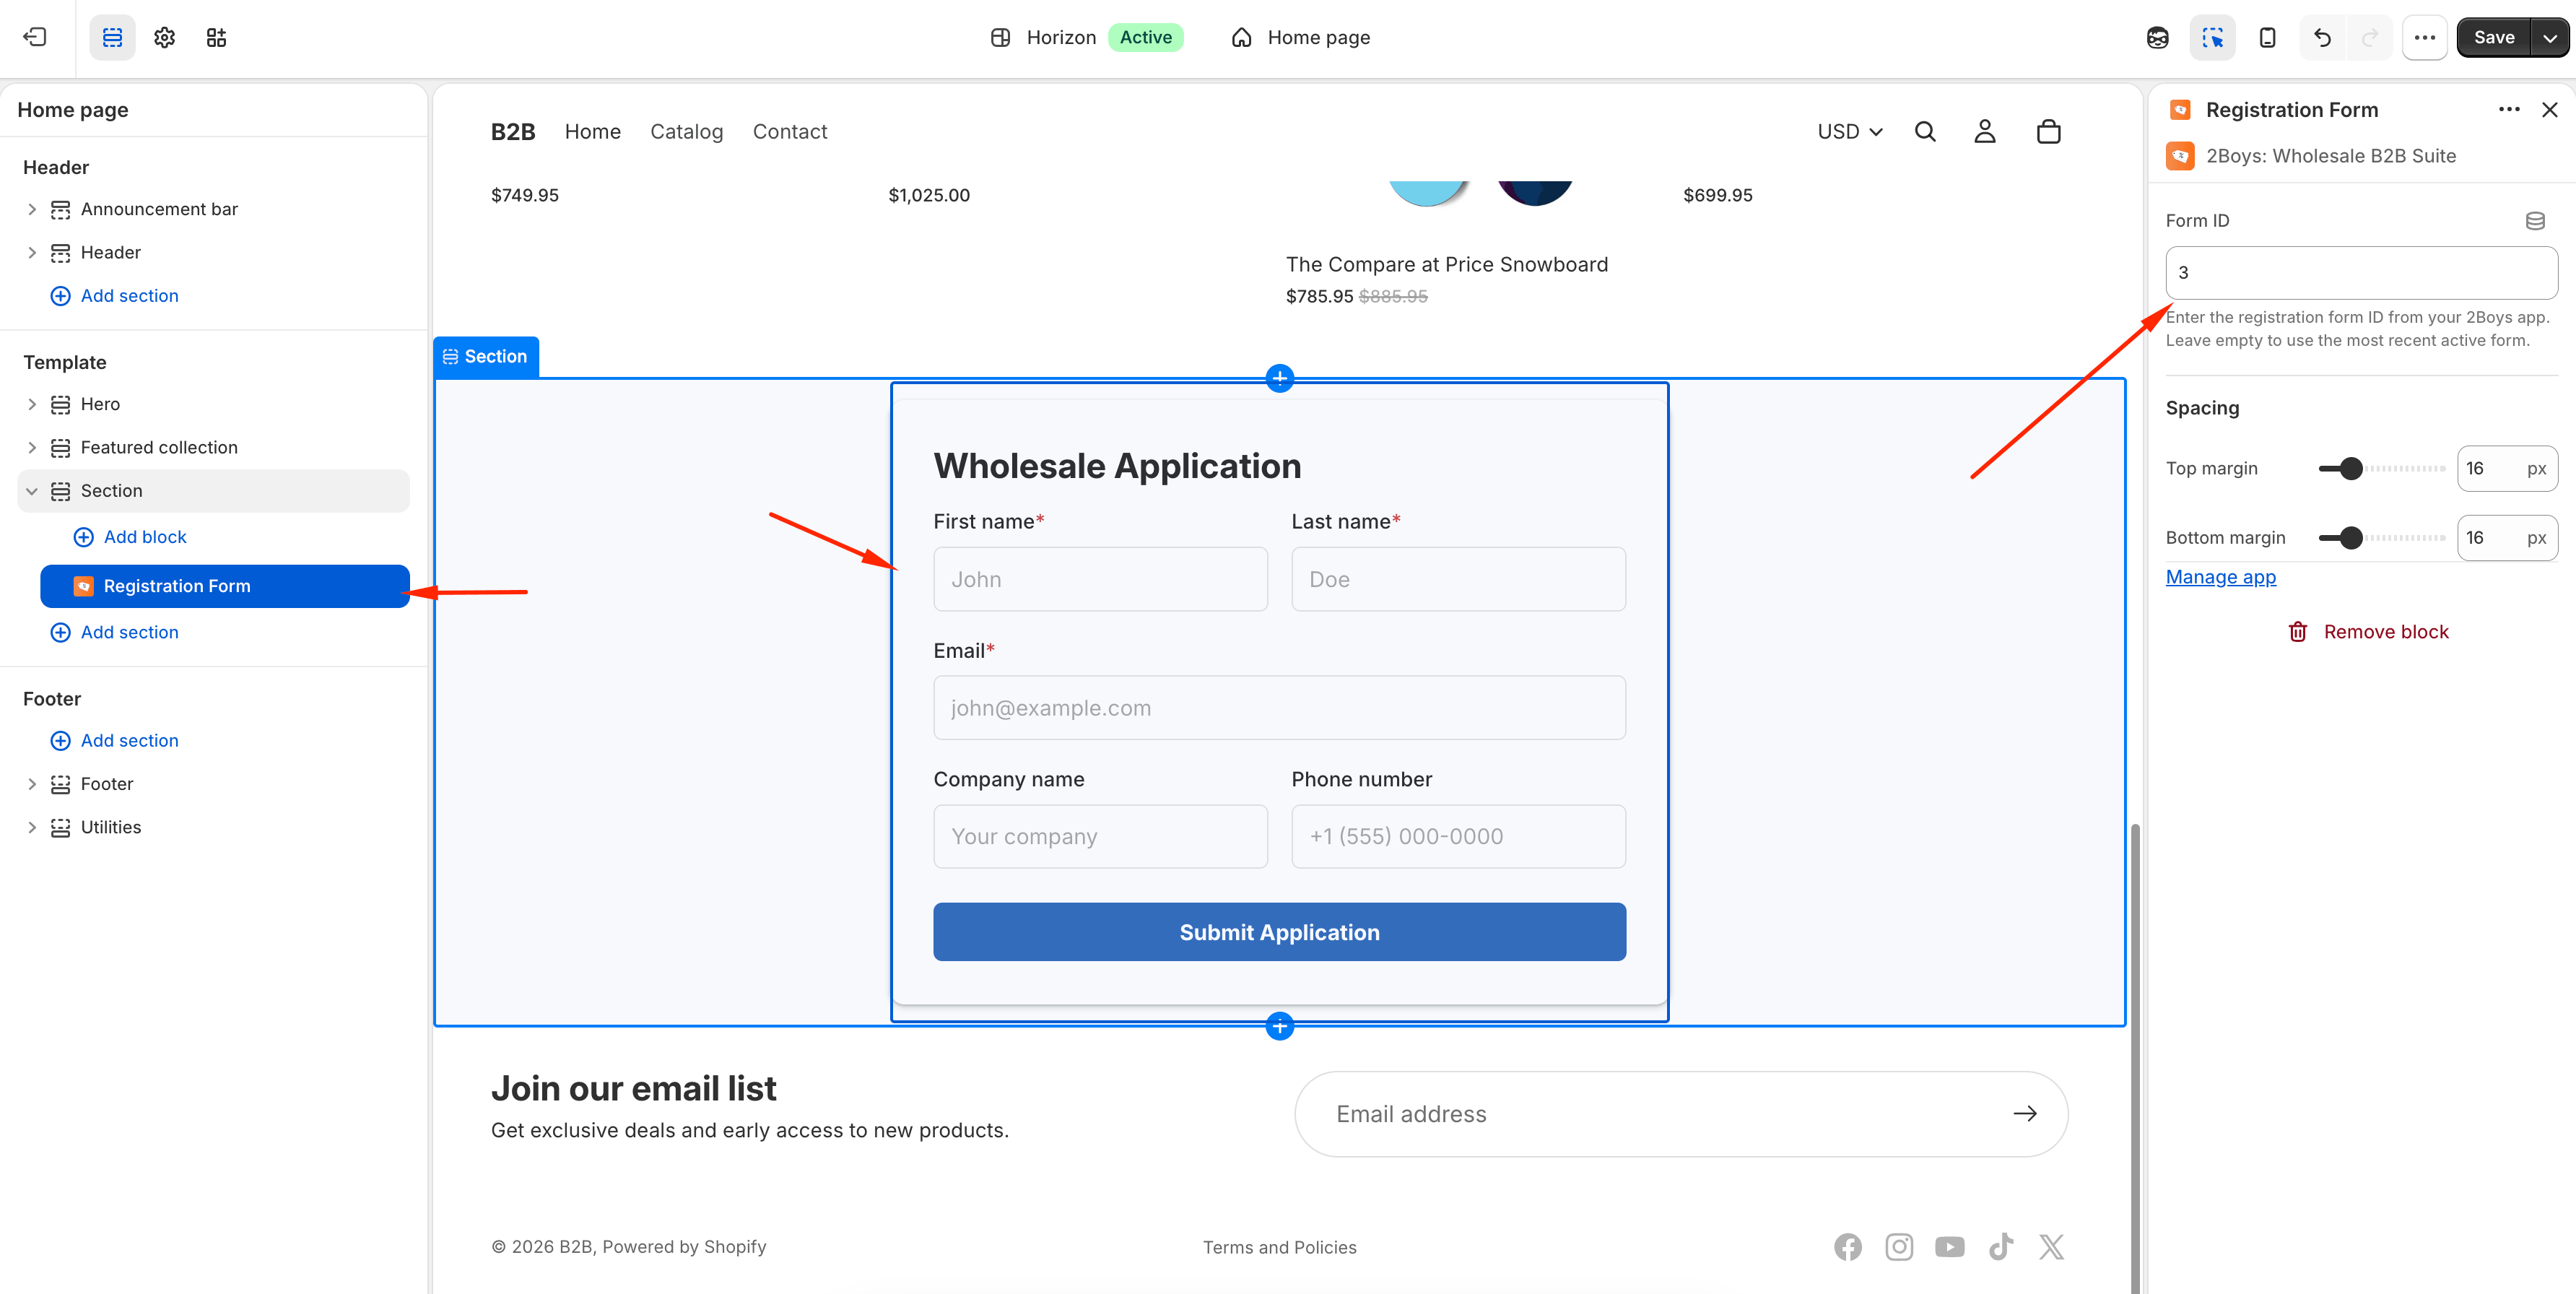
If you have multiple forms, you can place each on its own page. The block only renders one form at a time.
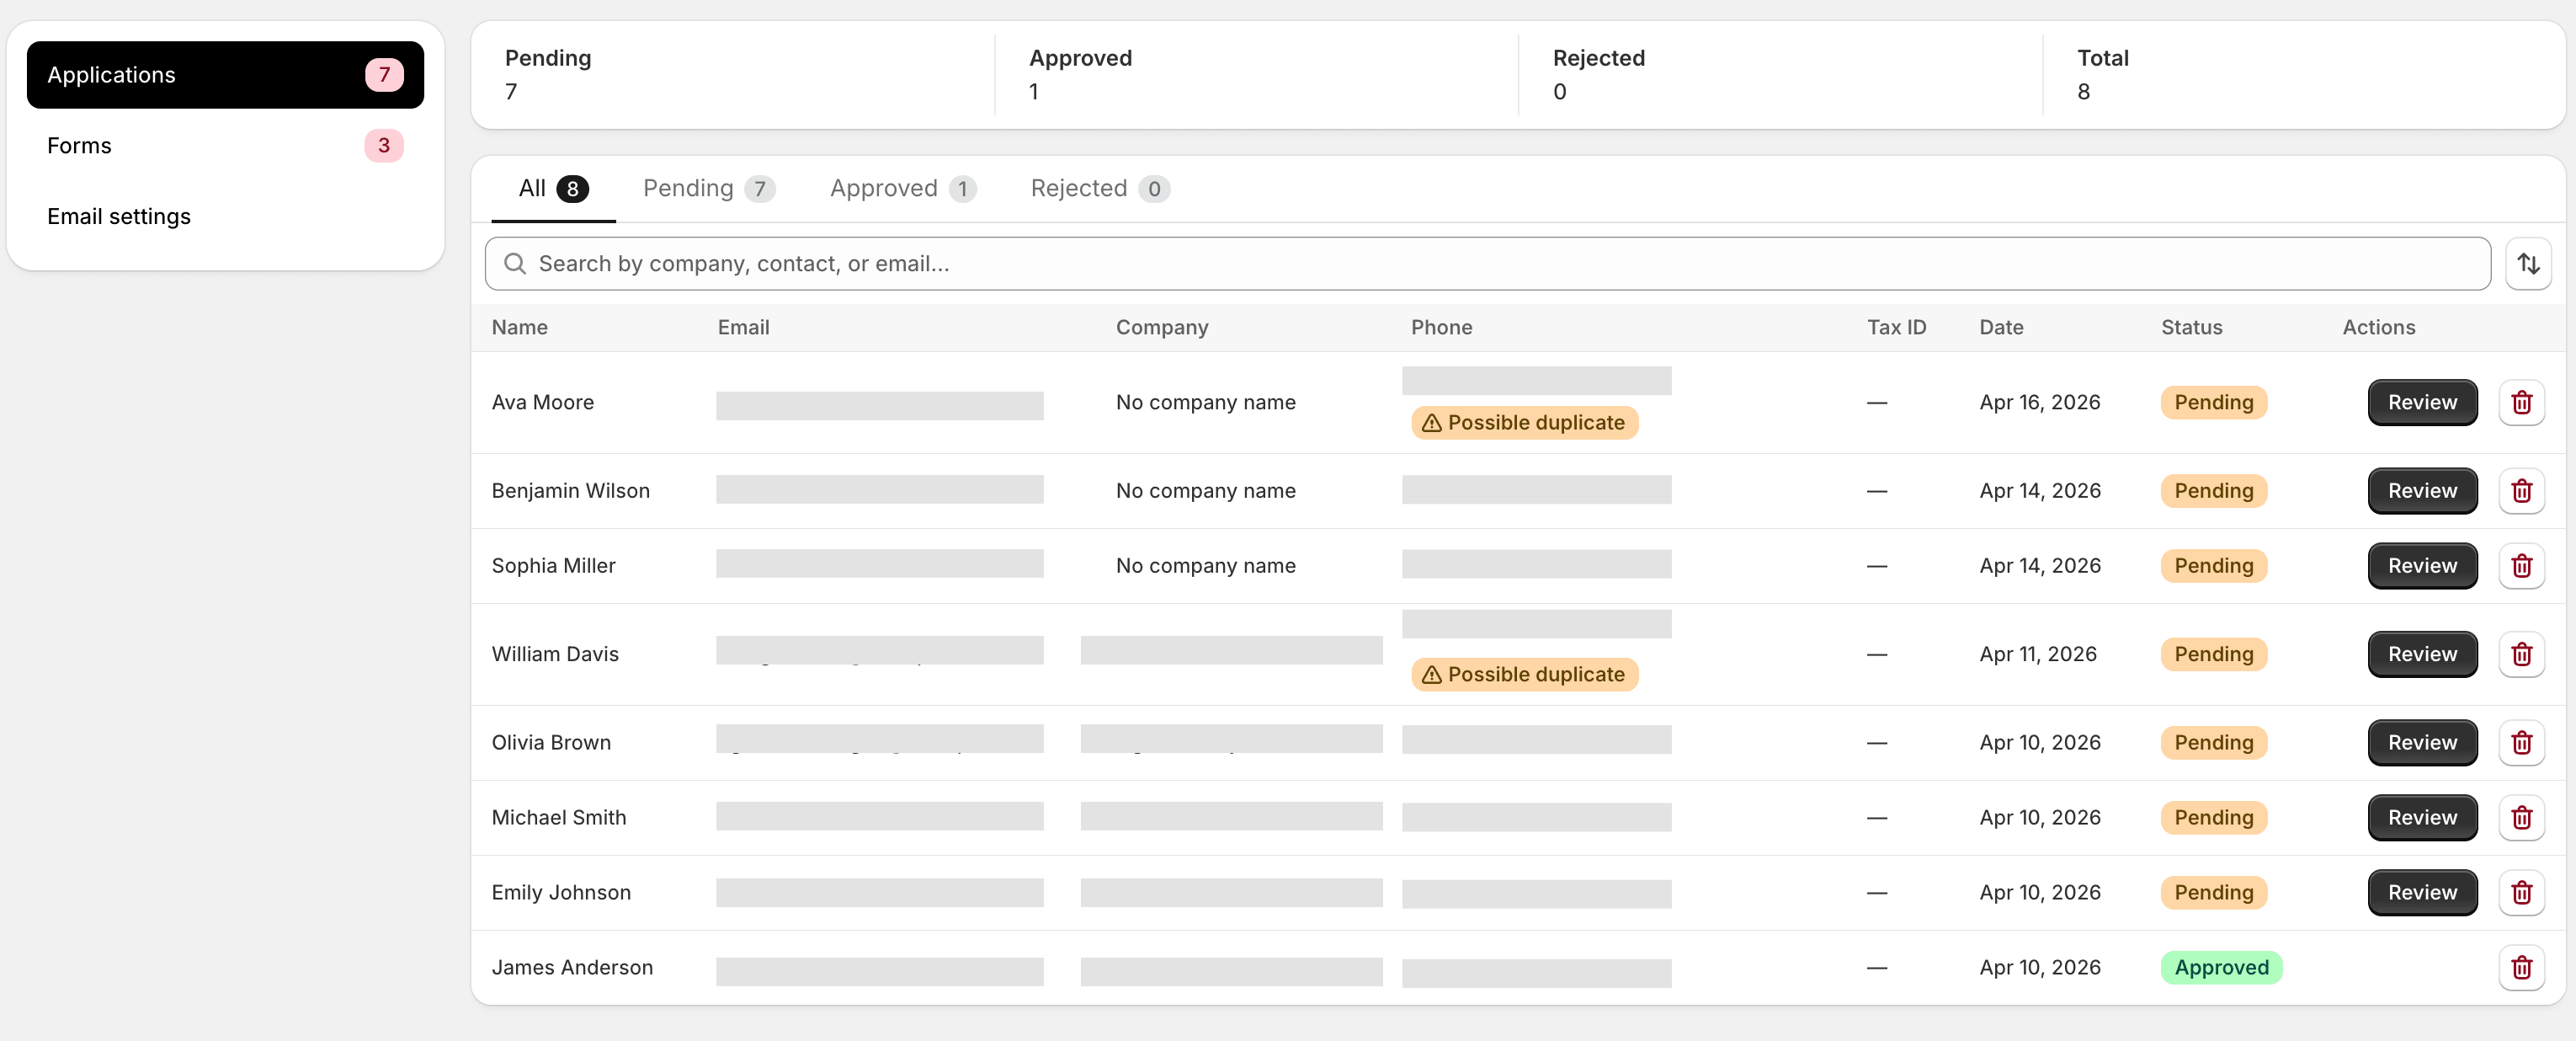
Review submissions
Section titled “Review submissions”- Open Registrations in the sidebar. Pending submissions sit at the top.
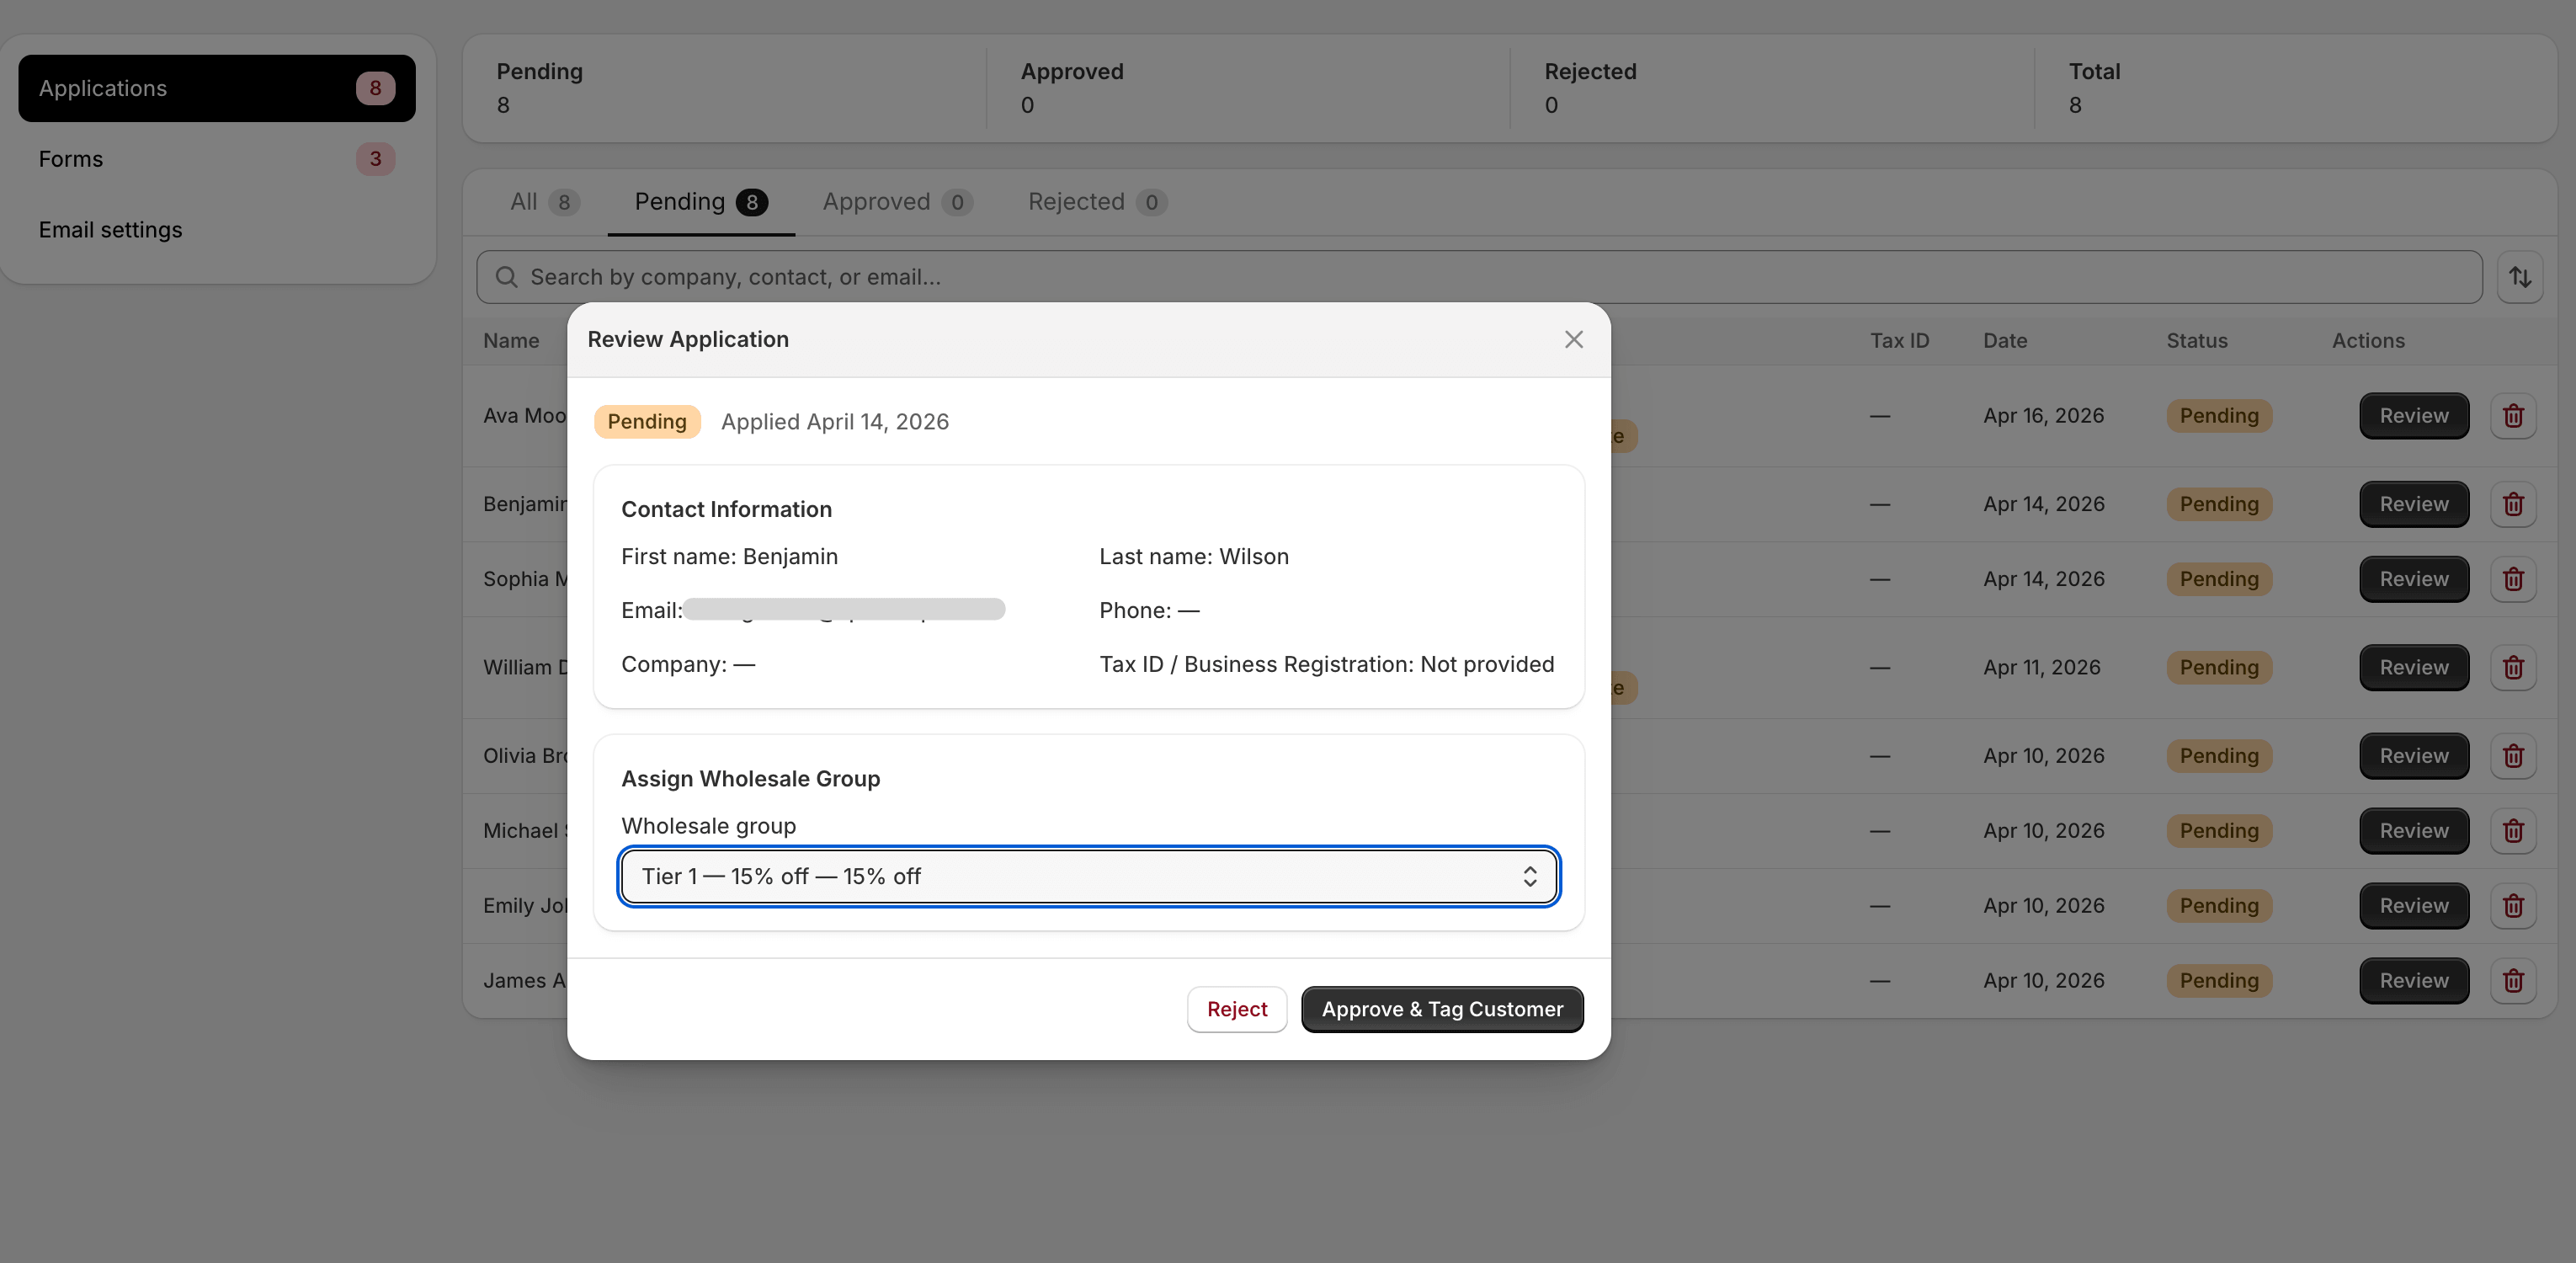
- Click a row to open the review panel. You’ll see all submitted fields, plus the buyer’s email and any custom-field values.
- Click Approve to choose a group and approve, or Reject and optionally add a reason.
What approval does
Section titled “What approval does”Approving a submission:
- Creates (or updates) a Shopify customer with the submitted name and email.
- Adds that customer to the group you picked, applying the
wholesale-<slug>tag. - Sends the Approved email template to the buyer.
- Marks the registration as
approvedin the database.
If the buyer already had a Shopify customer record, the app links to the existing record instead of creating a duplicate.
What rejection does
Section titled “What rejection does”Rejecting a submission marks it rejected and sends the Rejected
email template. It does not create or modify a Shopify customer
record. You can re-open a rejected submission later if circumstances
change.
Email templates
Section titled “Email templates”Under Registrations → Email settings there are two templates: one
for approval, one for rejection. Both support a basic set of
substitutions ({{first_name}}, {{shop_name}}, etc.). The
substitutions are listed on the page so you don’t need to memorise them.
Translating forms
Section titled “Translating forms”If your storefront serves multiple languages, you can translate the form’s labels and headings under Form translations. Set the form’s default locale, then add translations per locale and per field. The storefront block picks the active locale from Shopify and renders the translated copy.
What’s next
Section titled “What’s next”Set store-wide behaviour next: Store Settings.